
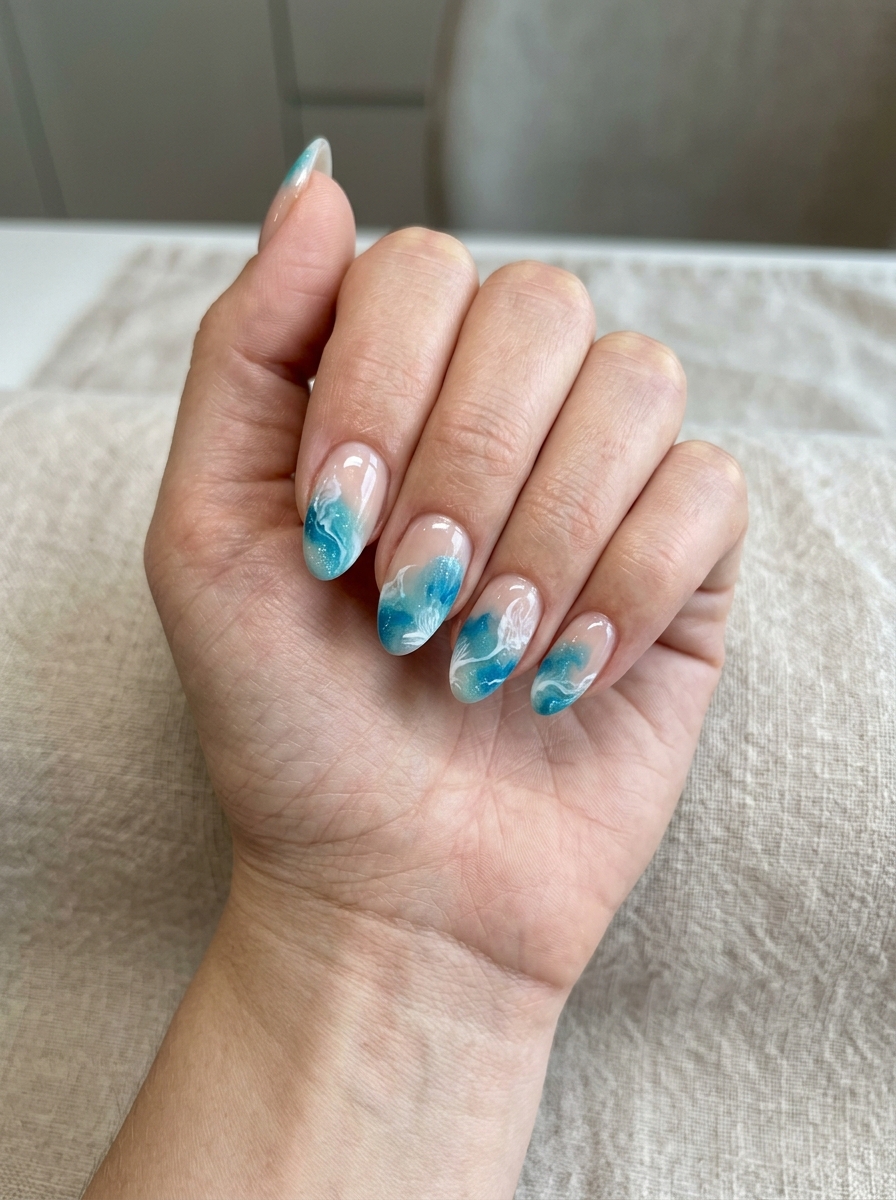
Blooming gel nail ideas can help you create soft flowers, marble lines, animal prints, and watercolor patterns with less effort. But choosing the right design can feel hard. Some styles look too detailed. Others may not suit your nail length or everyday style.
Blooming gel makes nail art look soft and fluid. The colors spread over the wet gel layer before curing. This creates patterns that look hand-painted, even when the design starts with a few simple dots or lines.
You can use this technique on short, long, square, almond, oval, or coffin nails. You can also keep the look soft with nude shades or make it bold with neon colors.
What Are Blooming Gel Nails?
Blooming gel nails use a special wet gel layer that helps added colors spread across the nail.
The blooming gel is applied over a cured base color. It is left uncured while drops, dots, or thin lines of colored gel are placed on top. The color slowly spreads and creates soft edges.
Small dots can turn into flower petals. Thin lines can spread into marble veins. Several colors can blend into a watercolor or smoke effect.
The amount of gel you use affects the final design. A small dot creates a controlled bloom. A larger drop spreads farther and may cover most of the nail.
You need to cure the nail when the pattern reaches the size you want. Waiting too long may cause the colors to spread too far.
The blooming gel technique works well for beginners because the pattern does not need to look perfect. Soft edges and uneven shapes are part of the style.
It is different from regular hand-painted nail art. Hand painting gives you sharp, controlled lines. Blooming nail art gives you softer shapes and a more natural flow.
Black and White Cow Print Blooming Nails
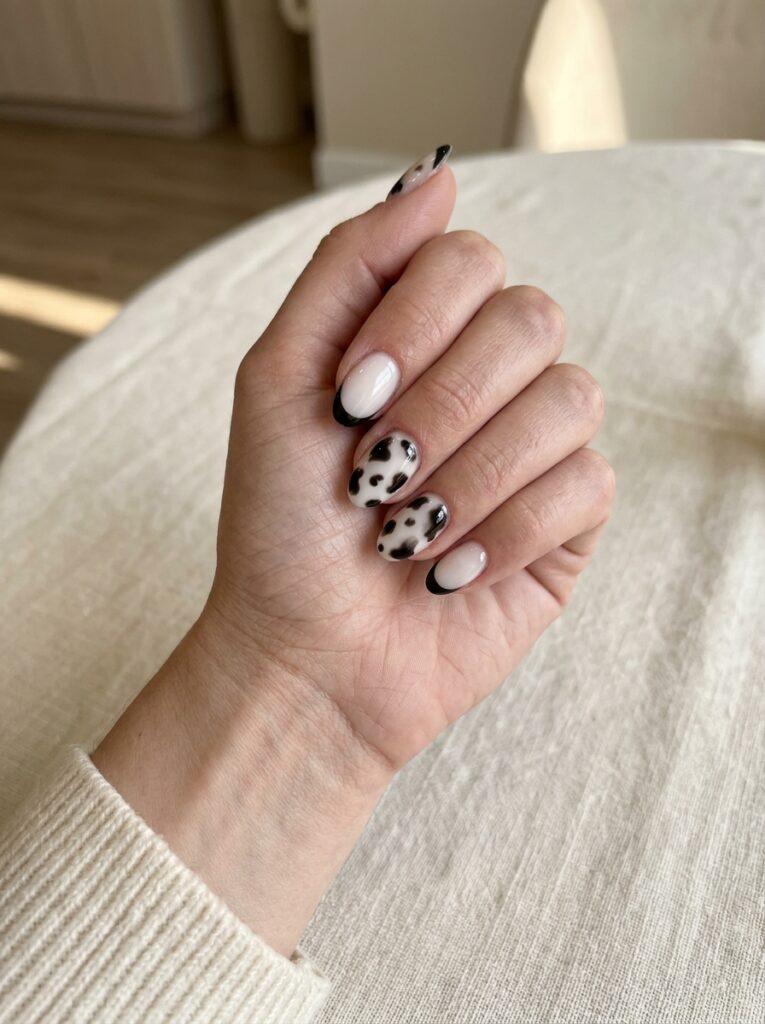
Cow print is one of the easiest blooming gel animal prints to try.
Use a white or milky base. Add uneven black dots over the uncured blooming gel. Let the dots spread until they form soft, irregular shapes.
Do not make every spot round. Cow print looks more natural when the spots have different sizes and edges.
You can cover every nail or use the print on two accent nails. Black French tips can help connect the whole set.
Best colors: Black and white
Best nail shape: Short square, almond, or coffin
Difficulty: Beginner
Try this: Add cow print only to the tips
This is a good beginner design because uneven spots are part of the look.
Black Cherry Abstract Blooming Nails
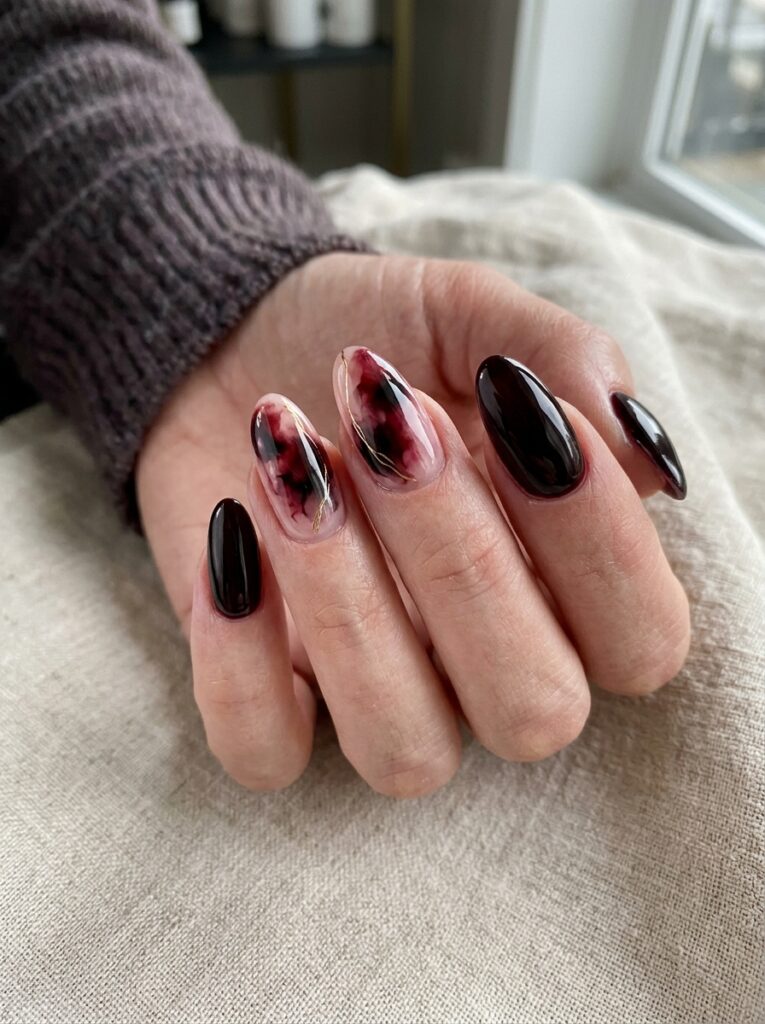
Black cherry nails are a strong choice for readers who like dark colors.
Use deep red, black, and sheer pink. Add uneven pools of color over the blooming gel and leave some nude space around them.
Each nail can have a different pattern. The set does not need to match perfectly.
You can add one or two thin metallic lines. Keep them light so the dark blooming colors remain the focus.
Best colors: Deep red, black, sheer pink
Best nail shape: Almond, square, or stiletto
Difficulty: Intermediate
Try this: Keep two nails solid black cherry
This design gives you dark nails without using one flat color.
Blooming Gel French Tips

Blooming gel French tips are a simple way to wear a detailed pattern.
Start with a nude or sheer pink nail bed. Apply blooming gel only inside the tip area.
You can use marble lines, small flowers, animal print, or watercolor colors inside the tip.
Short nails look better with a thin tip. Almond and coffin nails can hold a deeper curved design.
Best colors: Any two or three matching shades
Best nail shape: Short square, almond, or coffin
Difficulty: Intermediate
Try this: Use a different blooming pattern on each tip
Keeping the design at the tip makes busy patterns easier to wear.
Blue and White Porcelain Blooming Nails

Blue and white blooming nails can create a clean porcelain effect.
Use a white or milky base. Add cobalt blue or navy gel in small curved lines, dots, or petal shapes. Let the blue spread before adding more detail.
The finished pattern can look like painted ceramic flowers or soft leaves. You do not need to copy one exact print. Small differences on each nail make the design feel natural.
Keep some nails plain white or blue to stop the set from looking too busy.
A glossy topcoat helps the colors look smooth and polished.
Best colors: White, cobalt blue, navy
Best nail shape: Square, oval, or almond
Difficulty: Intermediate
Try this: Use the porcelain pattern on French tips
This style suits readers who want detailed nail art without using many colors.
Burgundy Wine Blooming Gel Nails
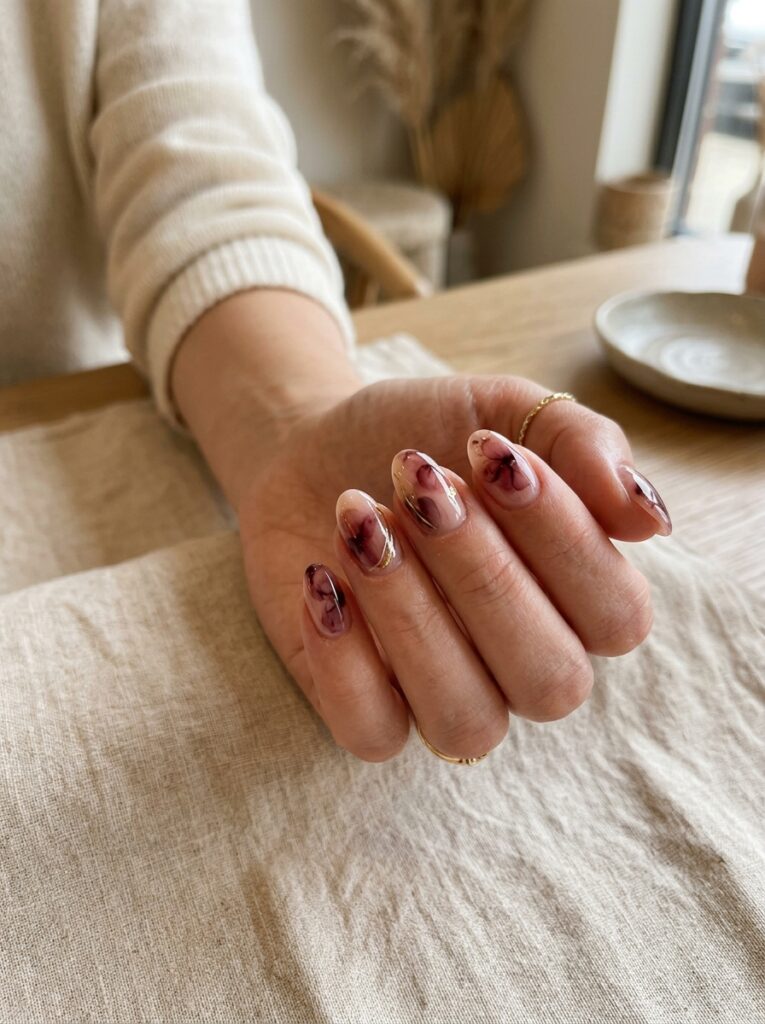
Burgundy blooming gel nails are rich without looking too bright.
Use a nude or pale pink base. Add burgundy, plum, or wine-colored drops and let them spread into soft flowers or abstract stains.
A sheer wine gel creates more depth than a thick, solid color. Add thin gold lines if you want a more formal finish.
This design works well during fall and winter, but it can also suit evening events all year.
Best colors: Burgundy, plum, berry, nude, gold
Best nail shape: Short square, almond, or oval
Difficulty: Beginner to intermediate
Try this: Use one sheer wine shade and one darker shade
The layered color creates more depth than a flat dark-red manicure.
Gold-Accented White Blooming Nails
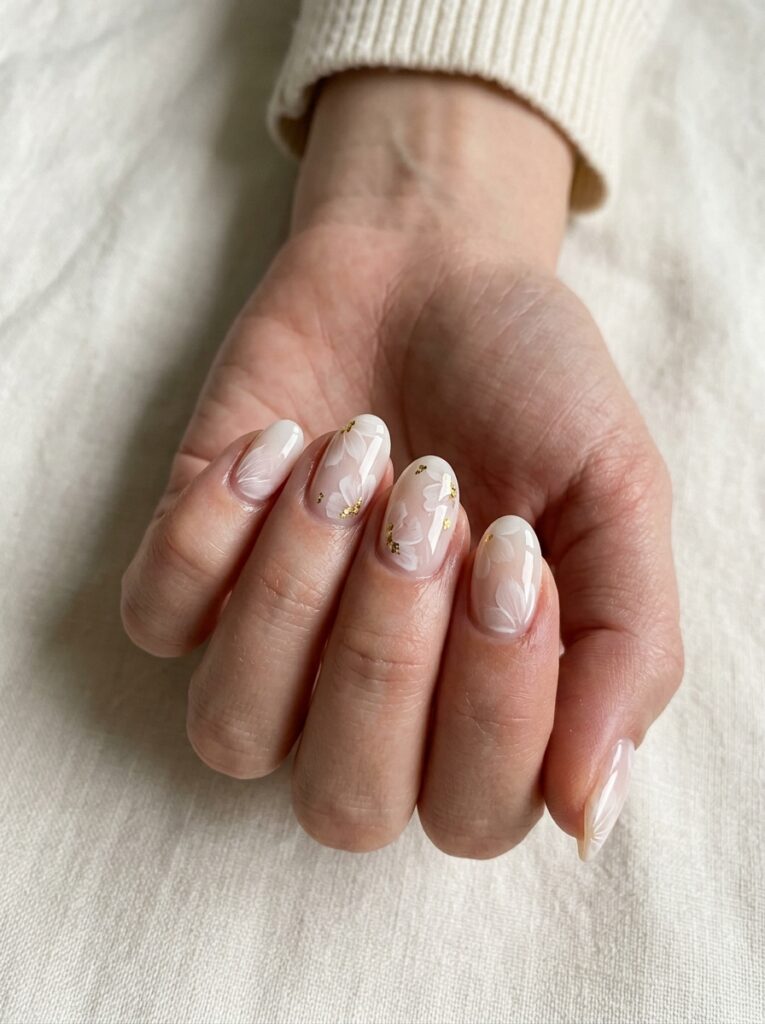
White blooming gel nails with gold accents look soft and polished.
Use a milky white or sheer nude base. Add thin white blooming lines or small flower shapes.
Place tiny pieces of gold foil between selected blooms. Do not cover every nail with foil. A small amount has more impact.
This style works well for weddings, parties, holidays, or simple everyday wear.
Best colors: Milky white, nude, gold
Best nail shape: Almond, oval, or coffin
Difficulty: Beginner to intermediate
Try this: Add gold to only two accent nails
Keeping the gold uneven helps the design look lighter.
Green Malachite Blooming Gel Nails
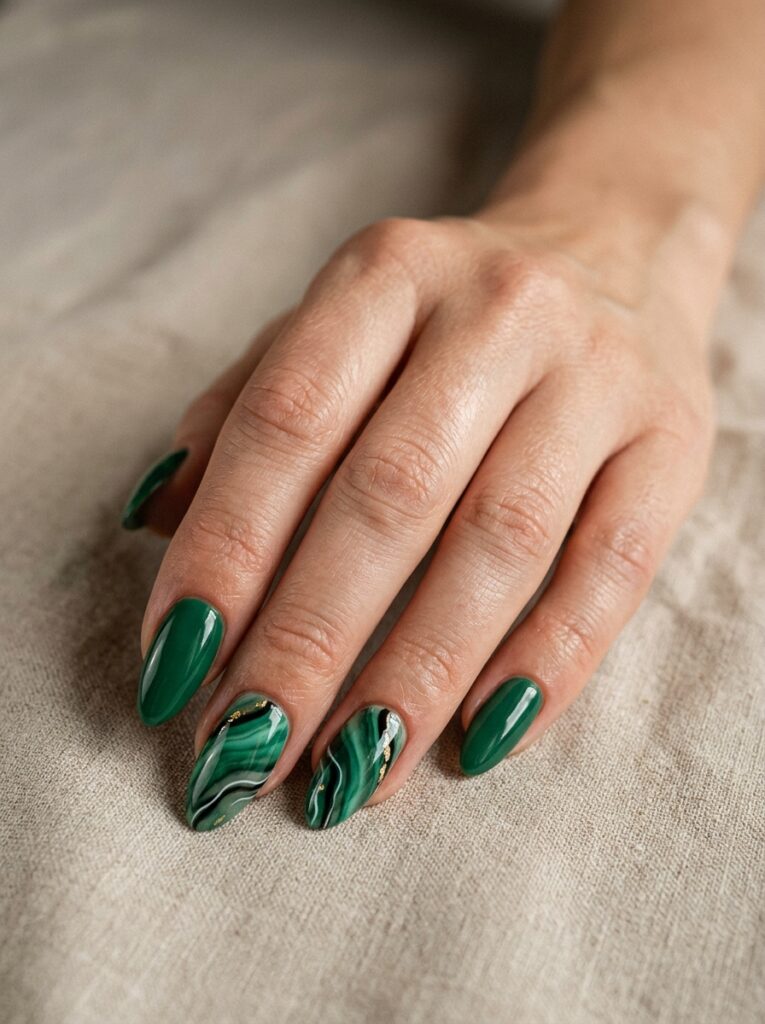
Green malachite nails copy the curved bands found in natural stone.
Use emerald, forest green, black, and small touches of white. Add curved lines over the blooming layer and allow them to spread.
The lines should move in different directions. Straight lines may look like regular marble instead of malachite.
Add a small amount of gold foil for contrast. You can also pair the design with solid dark green nails.
Best colors: Emerald, forest green, black, white, gold
Best nail shape: Almond, coffin, or square
Difficulty: Intermediate
Try this: Add malachite to two middle nails
Curved bands help create a stronger stone effect.
Leopard Print Blooming Gel Nails
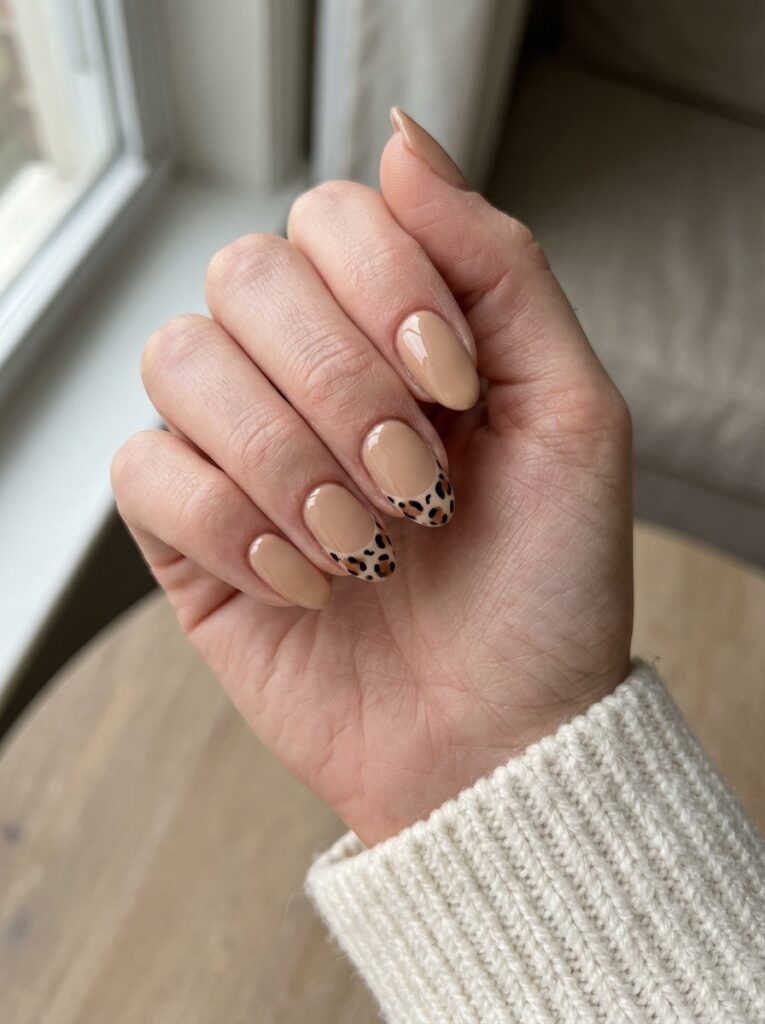
Leopard blooming gel nails can look bold or simple, depending on where you place the print.
Use a beige, nude, or caramel base. Add small brown dots over the blooming gel. Place short black lines around parts of each brown spot.
Do not draw a full black circle around every spot. Open edges make leopard print look more natural.
You can cover the full nail or keep the pattern inside the French tip area.
Best colors: Beige, caramel, brown, black
Best nail shape: Short square, almond, or coffin
Difficulty: Beginner to intermediate
Try this: Use leopard print on two French tips
French-tip leopard print is easier to wear than a full patterned set.
Matte Multicolor Abstract Blooming Nails
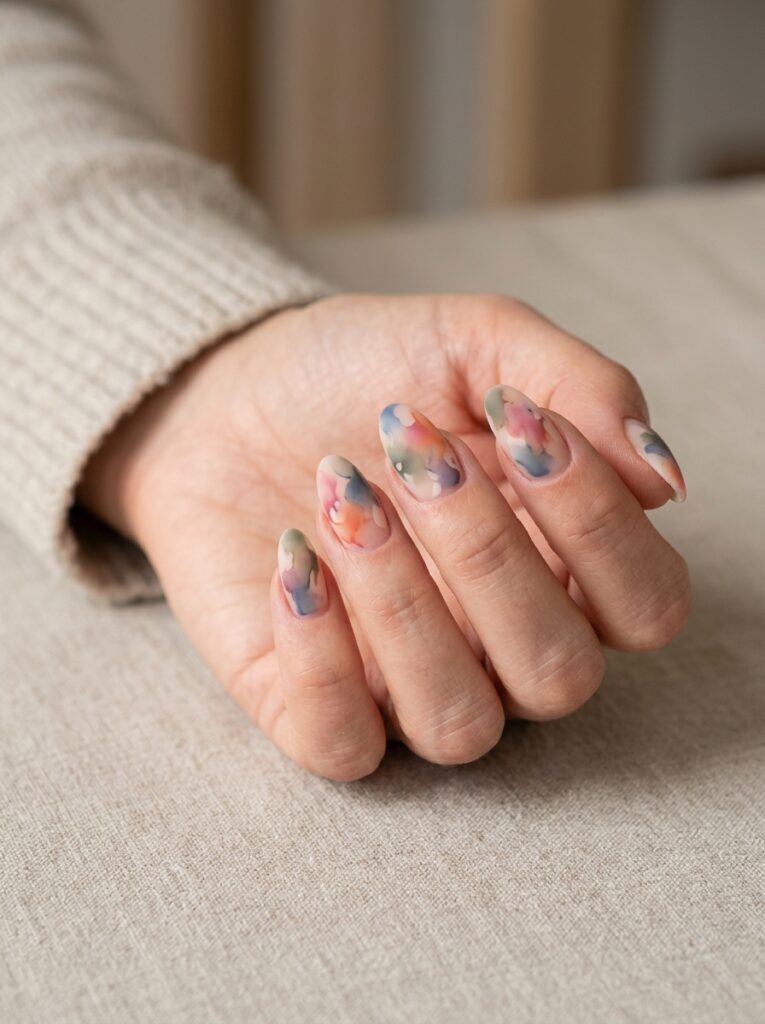
Matte multicolor blooming nails have a soft painted finish.
Use muted pink, orange, blue, green, or purple. Create a different bloom on each nail and leave some open space around the colors.
Finish the set with a matte topcoat. This changes the wet watercolor look into a softer art-style finish.
Avoid using too many bright colors together. Muted shades create a more balanced set.
Best colors: Muted pink, orange, blue, green, purple
Best nail shape: Medium almond, square, or coffin
Difficulty: Intermediate
Try this: Use three muted colors across the full set
The matte finish makes the design feel less glossy and more artistic.
Neon Rainbow Blooming Gel Nails

Neon blooming gel nails are bright and playful.
Use a white base to help the colors stand out. Add small drops of pink, orange, yellow, green, and blue over the blooming gel.
Leave space between each color. If all the shades touch at once, they may blend into a muddy pattern.
You can use all five shades or choose only three for a cleaner look. Pink, orange, and yellow create a warm set. Blue, green, and purple create a cooler one.
Best colors: Neon pink, orange, yellow, green, blue
Best nail shape: Medium almond, coffin, or square
Difficulty: Intermediate
Try this: Use three colors instead of five
This style works well for summer, holidays, and festival looks.
Nude and White Marble Blooming Gel Nails
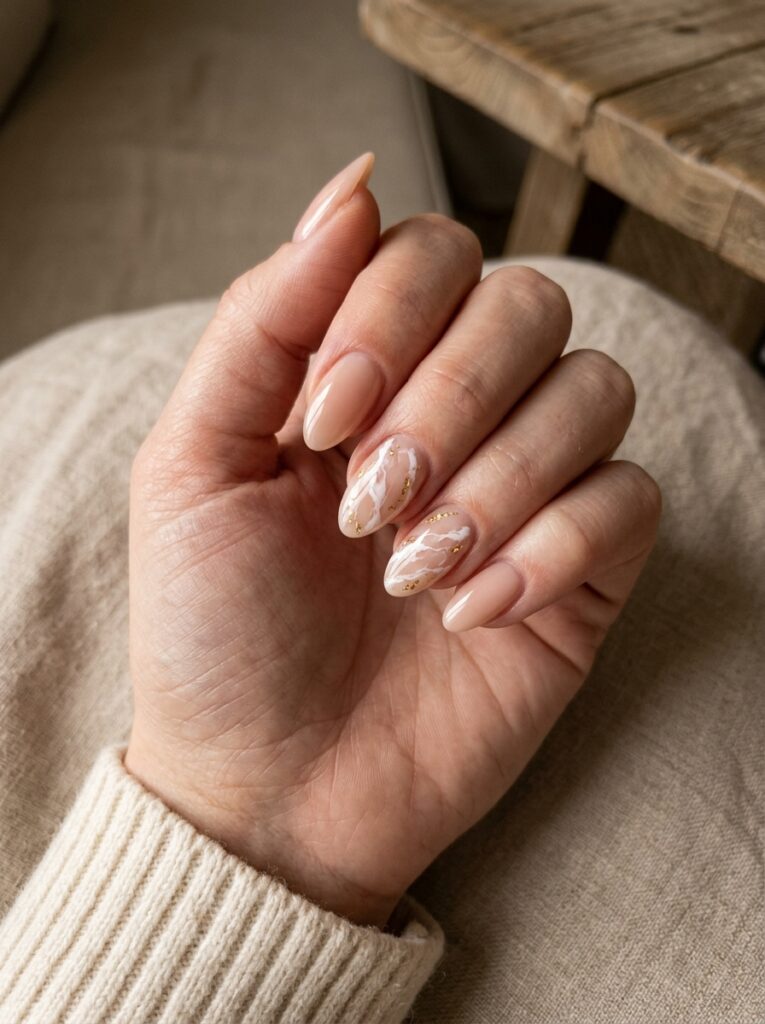
Nude and white marble nails are soft, clean, and easy to wear.
Begin with a sheer nude base. Apply blooming gel, then add thin white lines. Some lines should be narrow, while others can be slightly thicker.
Let the lines spread until they look like natural stone veins. Avoid making every line move in the same direction. Real marble has uneven patterns.
You can add a small amount of gold foil between the white lines. Keep it light so the gold does not hide the marble effect.
Best colors: Nude, white, soft beige, gold
Best nail shape: Almond, coffin, or square
Difficulty: Beginner to intermediate
Try this: Add marble to two nails and keep the rest nude
Different line thicknesses make the design look more natural.
Ocean Blue Blooming Gel Nails
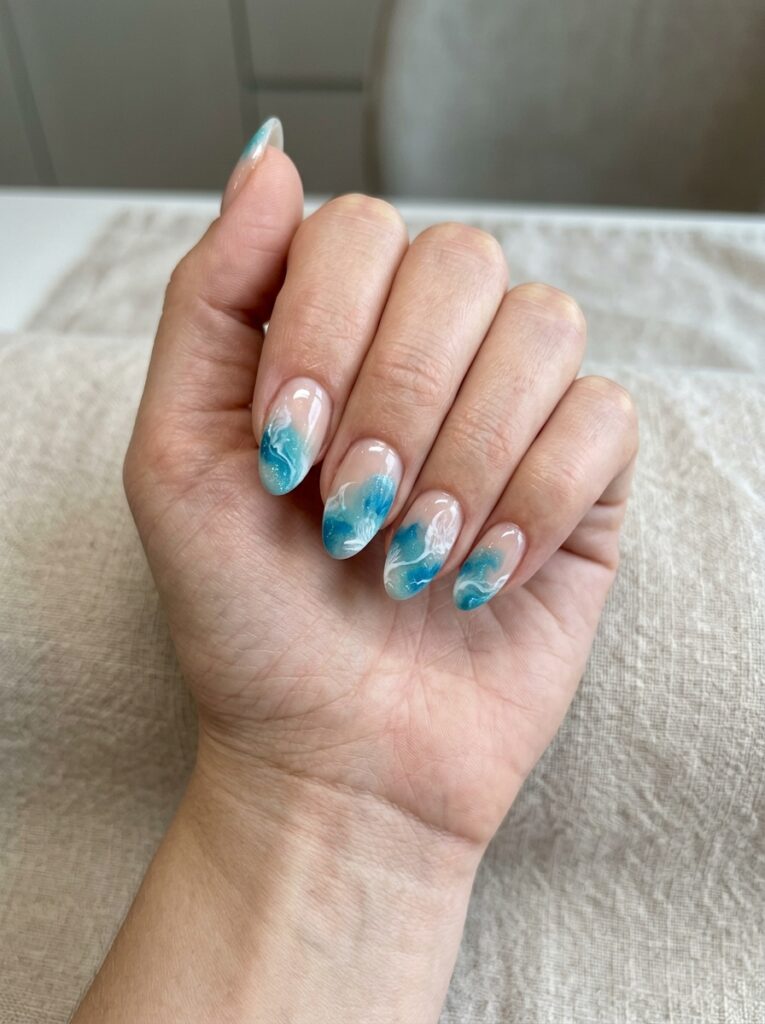
Ocean blue blooming gel nails create a soft water effect.
Blend turquoise, aqua, deep blue, and white over a sheer base. Use curved lines and small pools of color instead of round dots.
White blooming details can look like sea foam. You do not need to paint detailed waves.
A small amount of shimmer can add light without changing the design. Keep the shimmer fine and soft.
Best colors: Aqua, turquoise, deep blue, white
Best nail shape: Almond, oval, or coffin
Difficulty: Beginner to intermediate
Try this: Add the ocean pattern to the lower half of each nail
This is a simple way to create a beach-inspired manicure.
Pastel Watercolor Blooming Gel Nails
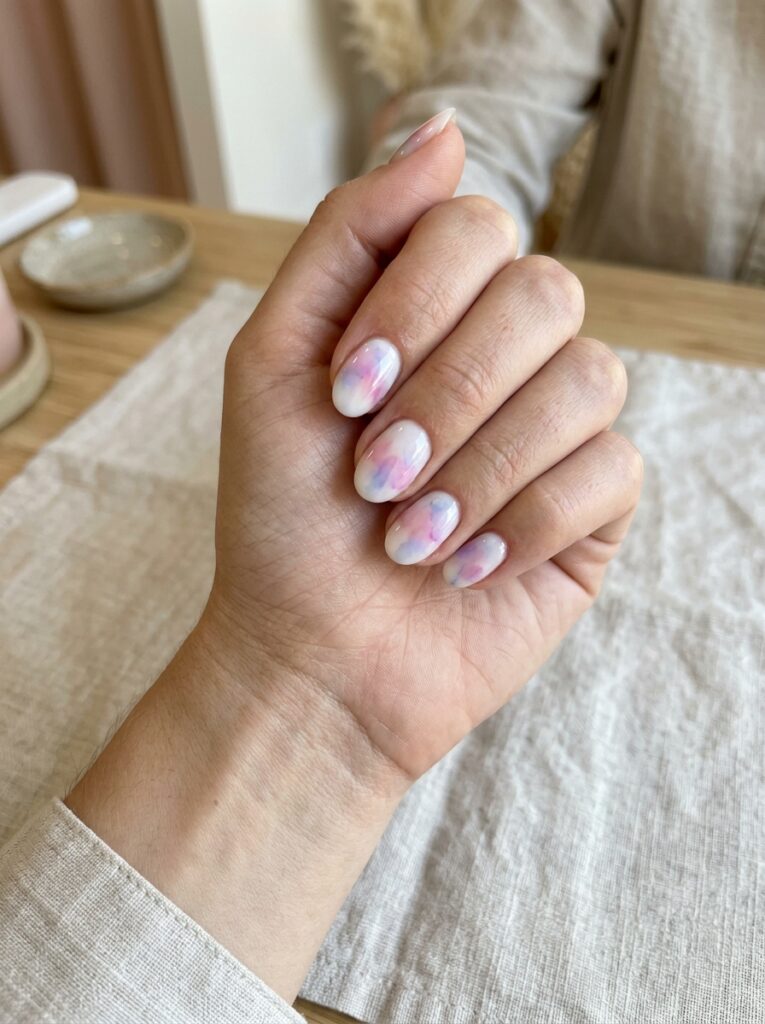
Pastel watercolor blooming gel nails have a soft, cloudy finish.
Choose pale pink, lavender, blue, mint, or yellow. Add small drops over a milky base and let the edges blend.
Do not cover the whole nail with color. Leaving some open space keeps the design light.
Short nails often look better with two or three pastel shades. Long nails can hold more colors without feeling crowded.
A glossy topcoat makes the colors look fresh. A satin topcoat creates a softer painted effect.
Best colors: Pink, lavender, mint, pale blue, yellow
Best nail shape: Any short or medium shape
Difficulty: Beginner
Try this: Use a different color pair on each hand
This is one of the easiest designs for beginners.
Purple Smoke Blooming Gel Nails
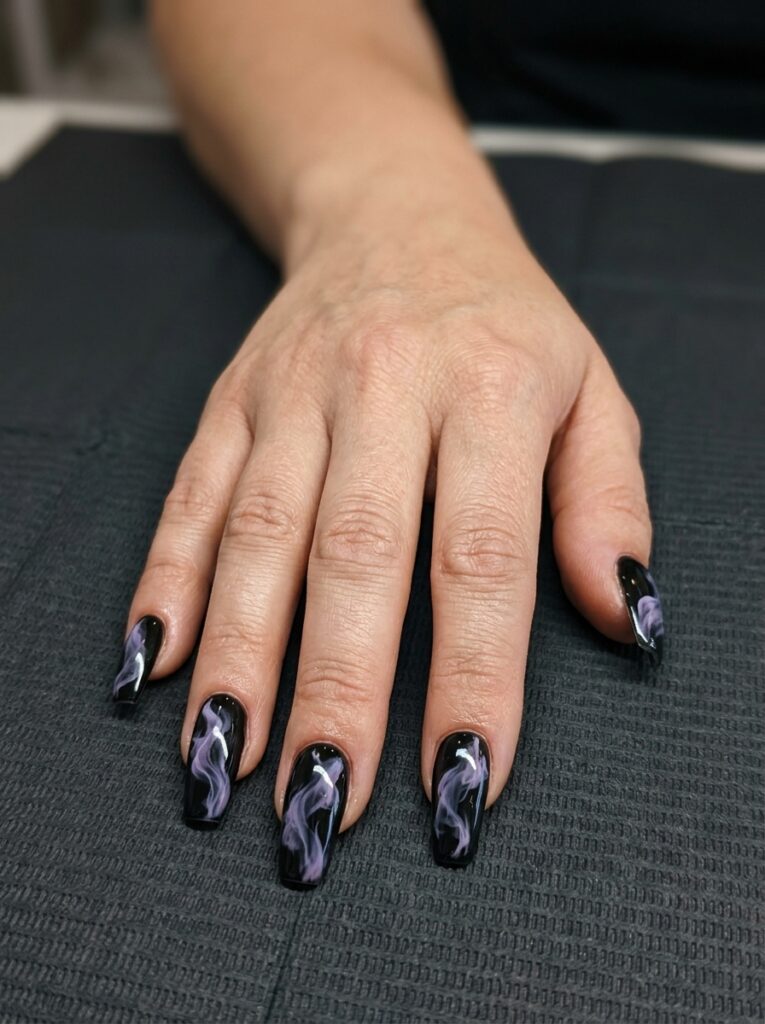
Purple smoke nails look soft, dark, and slightly dramatic.
Use a nude base for a light version or black for a stronger look. Add thin lavender, violet, and white lines over the blooming gel.
Use a liner brush to create curved wisps. Large drops may spread into circles instead of smoke.
Let the lines soften before curing. You can add another thin layer if the first pattern looks too light.
Best colors: Lavender, violet, white, black
Best nail shape: Almond, stiletto, or coffin
Difficulty: Intermediate
Try this: Use a sheer nude base for everyday wear
A black base gives the design a darker evening look.
Red Rose Blooming Gel Nails
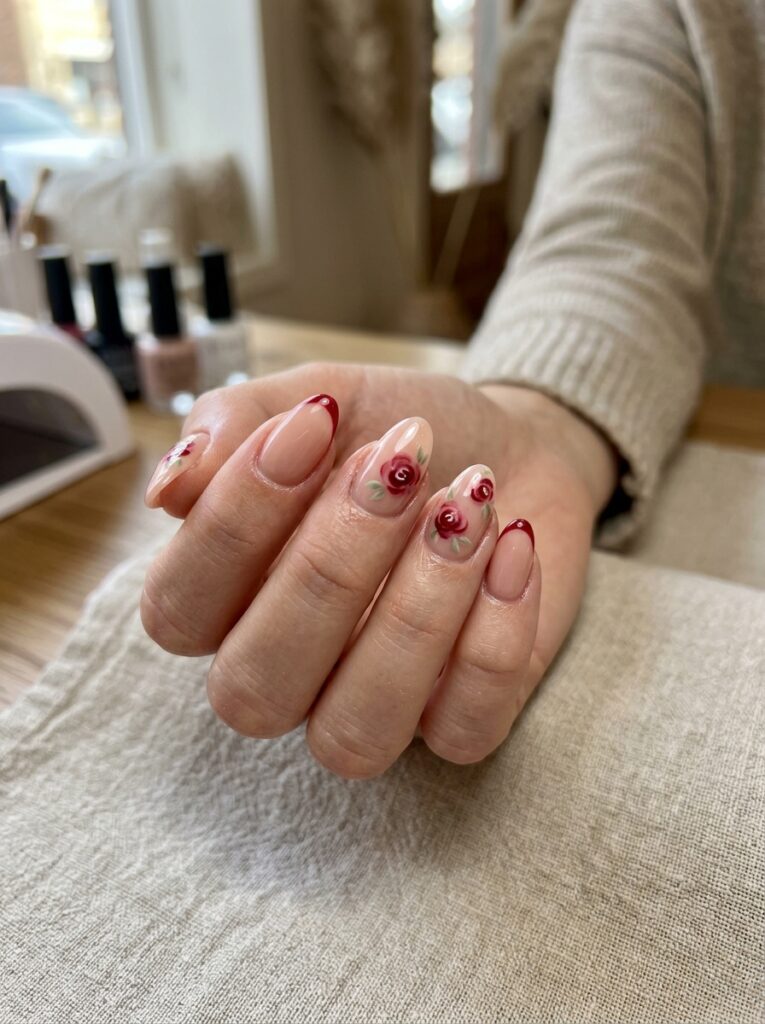
Red rose blooming gel nails create a bold floral manicure.
Start with a nude, blush, or milky white base. Add small curved red lines near the center of the nail. Let them spread slightly before adding another layer.
Use darker red in the middle of the rose. This gives the flower more depth.
Keep the first rose small. Large drops can spread too far and cover the whole nail.
You can add a few soft green leaves, but keep them simple. Too many details may compete with the roses.
Best colors: Red, burgundy, nude, soft green
Best nail shape: Almond, oval, or stiletto
Difficulty: Intermediate to advanced
Try this: Pair rose nails with red French tips
Starting with a small center gives you more control.
Soft Pink Floral Blooming Gel Nails
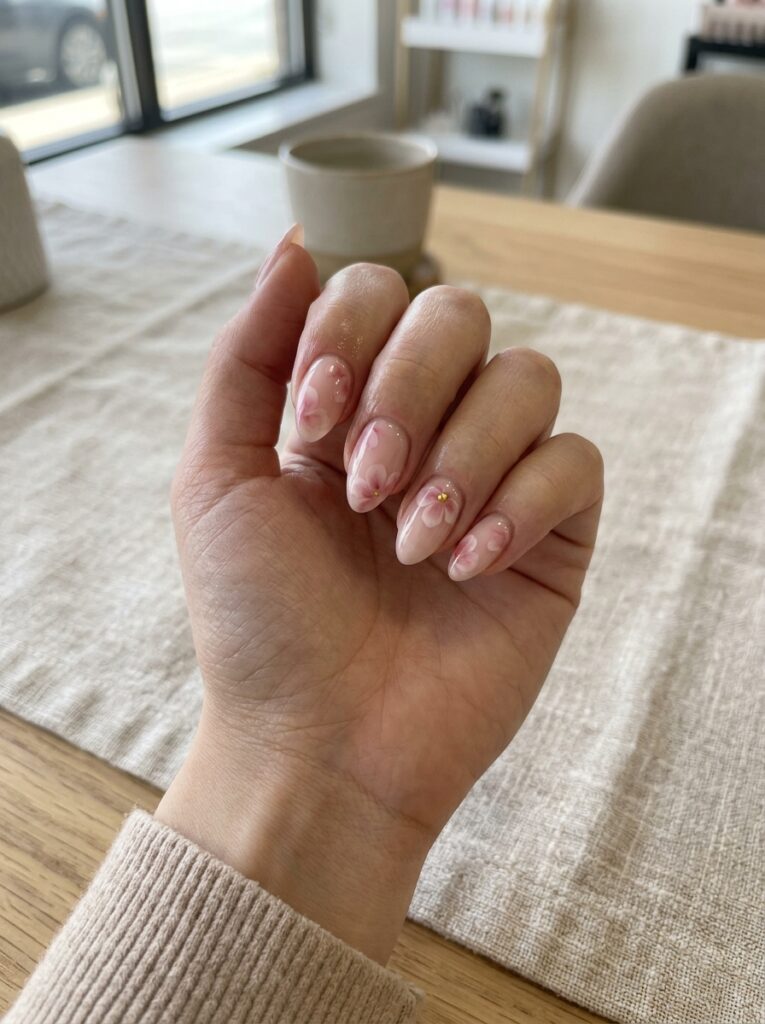
Soft pink floral blooming gel nails are a good choice when you want something light and romantic.
Start with a milky pink or sheer nude base. Add small white or deeper pink dots over the uncured blooming layer. Let the dots spread until they form soft petals.
Do not place the flowers too close together. Leaving space around each flower keeps the set clean and easy to see.
You can add a small gold dot, pearl, or rhinestone in the center of one or two flowers. Keep the other nails plain if you want a more wearable look.
Best colors: Milky pink, white, rose pink
Best nail shape: Almond, oval, or short round
Difficulty: Beginner to intermediate
Try this: Add flowers to two accent nails only
This design works well because the petals do not need perfect edges.
Tortoiseshell Blooming Gel Nails
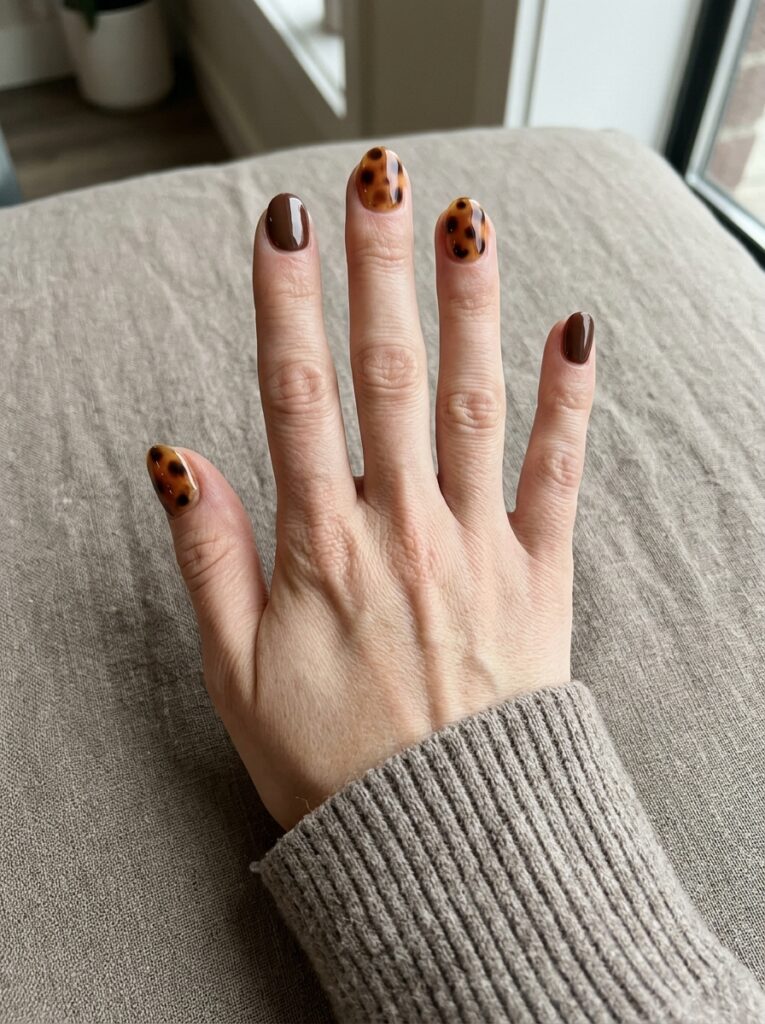
Tortoiseshell blooming gel nails use warm brown shades to create depth.
Start with a clear amber or caramel base. Add dark brown and black spots over the blooming layer. Let them spread, then cure the nail.
You can build the pattern in thin layers. Add more amber, brown, and black after curing the first layer. This stops the colors from mixing into one muddy shade.
Tortoiseshell works well as a full set, but it also looks good on one or two accent nails.
Best colors: Amber, caramel, dark brown, black
Best nail shape: Short square, oval, or almond
Difficulty: Intermediate
Try this: Pair it with solid chocolate-brown nails
Curing between layers helps keep the pattern clear.
How to Choose the Right Blooming Gel Nail Design
The best blooming gel nail designs depend on your nail length, color choice, and personal style.
Start by thinking about how bold you want your nails to look. Nude, white, pale pink, and soft blue create a simple manicure. Black, burgundy, neon, and dark green create a stronger look.
Your nail length also matters. Large floral and marble patterns have more space to spread on long nails. Short nails often look better with smaller blooms, French tips, or one accent nail.
Blooming gel designs for short nails should use fewer colors. Two or three shades are often enough. Too many colors can make a small nail look crowded.
You should also think about your skill level. Watercolor patterns, cow print, and simple marble lines are easier for beginners. Roses, stone patterns, and detailed flowers may need more control.
Use this quick guide to find a style that suits you:
| Your Style | Blooming Gel Design |
| Soft and simple | Nude marble or white flowers |
| Bright and playful | Neon rainbow |
| Dark and elegant | Burgundy or black cherry |
| Natural and earthy | Tortoiseshell or leopard print |
| Creative and artistic | Pastel watercolor or matte abstract |
When you are unsure, start with two colors and one or two accent nails.
How to Use Blooming Gel Without Making a Mess
Learning how to use blooming gel is easier when you work with thin layers and small amounts of color.
Follow these steps:
- Prepare and shape your nails.
- Apply your base coat and cure it.
- Apply your chosen base color and cure it.
- Add a thin, even layer of blooming gel.
- Do not cure the blooming layer yet.
- Add small dots, lines, or shapes with colored gel.
- Wait for the design to spread.
- Cure the nail when the pattern reaches the size you want.
- Apply topcoat and cure it based on the product instructions.
Do not wait too long before curing. The colors may keep spreading and lose their shape.
Use less color than you think you need. You can add more, but removing wet gel from one small area can be difficult.
This blooming gel tutorial works for simple flowers, marble, watercolor, and animal-print patterns.
Use this table to fix common problems:
| Problem | Likely Cause | Simple Fix |
| Color spreads too far | Too much colored gel | Use smaller dots or thinner lines |
| Pattern barely spreads | Blooming layer is too thin | Apply a more even layer |
| Colors look muddy | Too many wet shades overlap | Use fewer colors and leave space |
| Nail looks bulky | Gel layers are too thick | Apply thinner coats |
| Pattern looks uneven | Product amounts are different | Use a dotting tool for control |
Always follow the curing time listed by the gel brand. Lamps and gel systems can work differently.
How to Make Blooming Gel Nails Last Longer
A long-lasting blooming gel manicure starts with clean nail preparation.
Remove oil and dust from the nail before applying gel. Push back the cuticles and keep the product away from the skin.
Use thin layers. Thick gel can wrinkle, lift, or cure unevenly.
Apply each product carefully around the sidewalls and cuticle area. Gel that touches the skin may lift early.
Use products that are made to work together when possible. Check the brand instructions before mixing different gel systems.
Seal the design with a topcoat. Cap the free edge when the product instructions recommend it.
Wear gloves when cleaning or using harsh products. Long water exposure can also affect the manicure.
Use cuticle oil each day to keep the skin around your nails soft.
Do not peel off lifting gel. Peeling can remove layers from the natural nail. Use a safe removal method or visit a nail technician.
Even a well-applied manicure can lift early when you use your nails to open cans, scrape surfaces, or remove labels.
Final Thoughts
Blooming gel can create soft flowers, natural stone patterns, bold animal prints, and colorful abstract art.
You can keep the design simple with nude marble or white flowers. You can also choose neon colors, dark cherry shades, or detailed rose patterns.
Start with an easy style if you are new to blooming gel. Cow print, pastel watercolor, and simple marble lines are good first choices.
You can also ask your nail technician to adjust any design for shorter nails or softer colors.
Save your favorite blooming gel nail ideas before your next salon visit or at-home manicure.